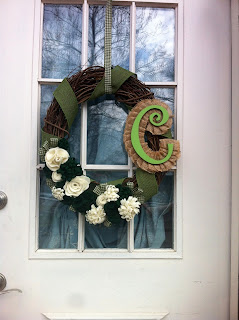
As we are nestling into this little townhouse, Darren and I have tried to decorate our home with the seasons on a budget. One of the first places a guest will look is, of course, the front door. Naturally, I wanted something to welcome them to our home. Thus, the wreath!
I'm a frequent pinterest user, and have seen multiple posts of burlap or yarn wreaths, which look easy enough to make. With the help of a gift card to Hobby Lobby from my dad (thanks, Dad!), this whole wreath cost less than $20 to make and I still have some supplies left over. I've never done a how-to blog post, so bear with me. This wreath was extremely simple to make, it just took some time (we popped in the Sound of Music and I was finished by the time Captain Von Trapp and Maria returned from their honeymoon).
Here is a list of the supplies you will need:
-scissors
-hot glue gun and glue sticks
-ribbon (mine is green checkered, 1")
-colored burlap (green)
-jute
-one wreath made of twigs/sticks from Hobby Lobby
-3 sheets each of green and ivory felt
-one wooden letter of your choice
-paint for the letter (green)
-paintbrush
My supplies
The first step I did was I painted the "C" so that by the time it dried, I would be finished with the wreath and ready to attach it.
First take a strip of felt and fold it in half, glue those edges together, and then cut slits in one side. On this first one I cut the strips at an angle. I'll show you the difference between the angle and straight cuts later.
Put a drop of glue on one end and tight-roll this, adding glue as you go. Here is how it should look once it's all rolled together:
Obviously there are ways to add variation. If you want the petals to be thinner, cut the strips thinner. In order to have a smaller diameter flower, make the strip shorter like these two:
Next are the rosettes. I really like these since they're simple and cute. Cut a circle in the felt, and then cut a spiral within that circle.
Roll the felt from the outer edge in (yes, seems counter-intuitive), gluing as you go.
And voila, here is your rosette!
A variation on this one is a wavy rosette, where you cut the felt in a wave and roll it up to get this:
Finally, one other felt flower I chose is this little ball of wavy petals. You start by cutting 9 equal circles and one smaller one for the base.
Take the first circle, put a dab of glue on it, and fold it in half. Then do the same and fold it again to be a fourth. Glue that to the base. Do the same with 3 other circles until you have all four like this:
Keep in mind that you want the open ends to face the same direction.
Add the next 4 circles the same way, only off the creases from the previous ones. Then take your final circle and loosely roll it, placing it in the center. Fluff up your layers and this is what you get:
So, I made all of the flowers in both ivory and green for this wreath. Here's what I had to show for it...
I took a break from the flowers and used my green burlap to loosely wrap around the wreath. I glued the beginning spot, then again at the end to hold it in place. You may want to add some glue on the back where the burlap comes close to the wreath just to hold it in place.
It's time to finally start putting your flowers on. Now, I didn't have any rhyme or reason for the order of my flowers, just glued them where it looked good.
After adding the flowers, I felt like there were some holes on the ends and in the middle, so I took my ribbon to add a little bit of color in those holes. I cut strips about 4" long, folded them in half and put a dot of glue on them. In some areas, I wanted more than one little ribbon, so I would glue 2 or 3 together like these:
I tucked them into the holes in the flowers.
Next, I took my dried "C" and wanted to give it a background so I glued the jute on the back. I started at one end, then continued to fold and glue in the shape of the letter like this (ignore the maroon sweatpants):
Here's how the letter looks with the jute behind it:
I put a ridiculous amount of hot glue on the "C" and added it to the wreath.
Finally, I made a quick ribbon holder around the top of the wreath so it could hang on the hook of my front door.
Here it is, the final product!
I enjoyed putting this together and now will be able to display it every March...and all in time to sing along with the Von Trapp Family Singers before they are chased by the Nazi's!
I hope this helps inspire you to make your own :)


No comments:
Post a Comment